clEsperanto#
clEsperanto 是一个跨多个生物图像分析生态系统的项目,旨在消除语言障碍。它基于 OpenCL,这是一个用于编程图形处理单元(GPU 等)的开放标准,以及其 Python 封装 pyopencl。在底层,它使用来自 clij 项目的处理内核。
另请参阅
GPU 初始化#
我们首先初始化并查看安装了哪些 GPU:
import pyclesperanto_prototype as cle
import matplotlib.pyplot as plt
import stackview

# list available devices
cle.available_device_names()
['NVIDIA GeForce RTX 3050 Ti Laptop GPU',
 'gfx1035',
 'cupy backend (experimental)']
# select a specific device with only a part of its name
cle.select_device("2080")
C:\Users\haase\mambaforge\envs\bio39\lib\site-packages\pyclesperanto_prototype\_tier0\_device.py:77: UserWarning: No OpenCL device found with 2080 in their name. Using gfx1035 instead.
  warnings.warn(f"No OpenCL device found with {name} in their name. Using {device.name} instead.")
<gfx1035 on Platform: AMD Accelerated Parallel Processing (2 refs)>
# check which device is uses right now
cle.get_device()
<gfx1035 on Platform: AMD Accelerated Parallel Processing (2 refs)>
处理图像#
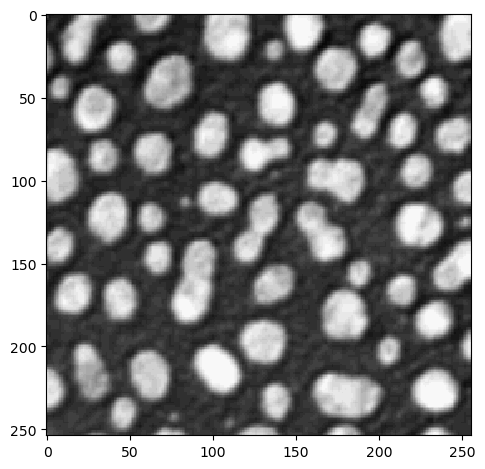
对于加载图像数据,我们像往常一样使用 scikit-image:
from skimage.io import imread, imshow

image = imread("../../data/blobs.tif")
imshow(image)
<matplotlib.image.AxesImage at 0x206d07ad0a0>
cle. 网关包含了你需要的所有方法,它没有子包:
# noise removal
blurred = cle.gaussian_blur(image, sigma_x=1, sigma_y=1)
blurred

|
cle._ image

|
# binarization
binary = cle.threshold_otsu(blurred)
binary

|
cle._ image

|
# labeling
labels = cle.connected_components_labeling_box(binary)
labels

|
cle._ image
|
# visualize results
imshow(labels)
C:\Users\haase\mambaforge\envs\bio39\lib\site-packages\skimage\io\_plugins\matplotlib_plugin.py:149: UserWarning: Low image data range; displaying image with stretched contrast.
  lo, hi, cmap = _get_display_range(image)
<matplotlib.image.AxesImage at 0x206d2d6cb80>
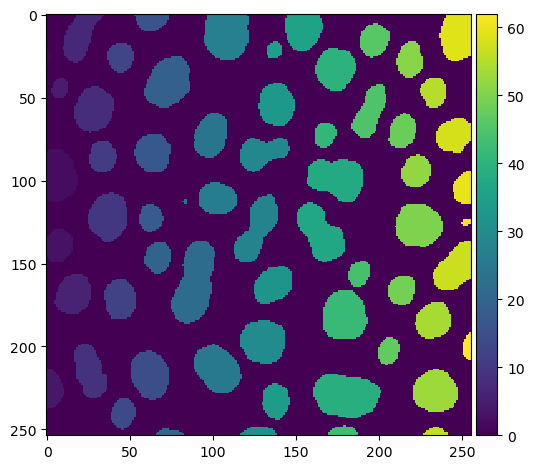
stackview 还带有一个 imshow 函数,它允许更方便地显示标签图像:
stackview.imshow(labels)

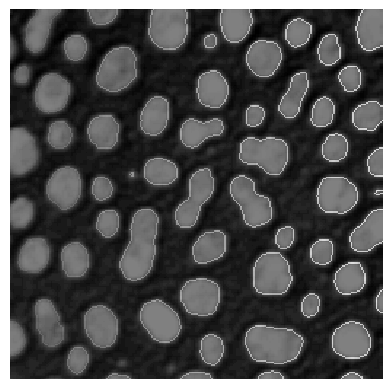
还可以确定标签边缘并将它们混合到图像上。
label_edges = cle.detect_label_edges(labels) * labels

stackview.imshow(image, continue_drawing=True)
stackview.imshow(label_edges, alpha=0.5)
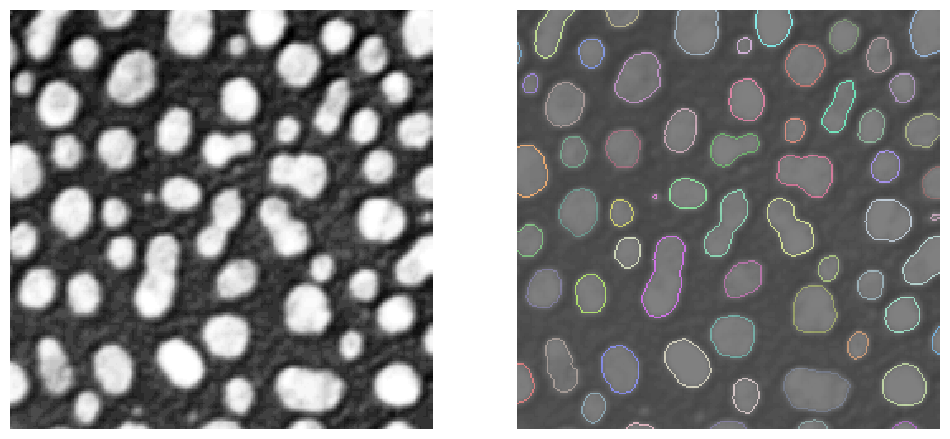
因此,增加图形大小并组合多个子图可能是有意义的
fig, axs = plt.subplots(1, 2, figsize=(12,12))

# left plot
stackview.imshow(image, plot=axs[0])

# right plot
stackview.imshow(image, alpha=0.5, continue_drawing=True, plot=axs[1])
stackview.imshow(label_edges, labels=True, alpha=0.5, plot=axs[1])
其中一些操作,例如 voronoi_otsu_labeling,实际上是快捷方式,它们结合了多个操作,如高斯模糊、Voronoi 标记和 Otsu 阈值处理,直接从原始图像得到标签图像:
labels = cle.voronoi_otsu_labeling(image, spot_sigma=3.5, outline_sigma=1)
labels

|
cle._ image
|
另外,再次提醒,请阅读你之前未使用过的方法的文档:
print(cle.voronoi_otsu_labeling.__doc__)
Labels objects directly from grey-value images.

    The two sigma parameters allow tuning the segmentation result. Under the hood,
    this filter applies two Gaussian blurs, spot detection, Otsu-thresholding [2] and Voronoi-labeling [3]. The
    thresholded binary image is flooded using the Voronoi tesselation approach starting from the found local maxima.

    Notes
    -----
    * This operation assumes input images are isotropic.

    Parameters
    ----------
    source : Image
        Input grey-value image
    label_image_destination : Image, optional
        Output image
    spot_sigma : float, optional
        controls how close detected cells can be
    outline_sigma : float, optional
        controls how precise segmented objects are outlined.

    Returns
    -------
    label_image_destination

    Examples
    --------
    >>> import pyclesperanto_prototype as cle
    >>> cle.voronoi_otsu_labeling(source, label_image_destination, 10, 2)

    References
    ----------
    .. [1] https://clij.github.io/clij2-docs/reference_voronoiOtsuLabeling
    .. [2] https://ieeexplore.ieee.org/document/4310076
    .. [3] https://en.wikipedia.org/wiki/Voronoi_diagram
互操作性#
在 pyclesperanto 中,图像在 GPU 的随机存取存储器(RAM)中处理。如果你想使用其他在 GPU 上处理图像的库,内存必须被传回。通常,这对用户来说是透明的,例如在使用 scikit-image 测量区域属性时:
from skimage.measure import regionprops

statistics = regionprops(labels)

import numpy as np
np.mean([s.area for s in statistics])
333.77272727272725
如果你想显式地转换你的图像,例如转换为 numpy 数组,你可以这样做:
np.asarray(labels)
array([[ 0,  0,  0, ..., 62, 62, 62],
       [ 0,  0,  0, ..., 62, 62, 62],
       [ 0,  0,  0, ..., 62, 62, 62],
       ...,
       [ 0,  0,  0, ...,  0,  0,  0],
       [ 0,  0,  0, ...,  0,  0,  0],
       [ 0,  0,  0, ...,  0,  0,  0]], dtype=uint32)
内存管理#
在 Jupyter 笔记本中,只要笔记本内核在运行,变量就会保持活跃状态。因此,你的 GPU 可能会被内存填满。因此,如果你不再需要一个图像,请使用 del 从内存中删除它。由于 pyopencl 的魔法,它将从 GPU 内存中被移除。
del image
del blurred
del binary
del labels